
This tutorial is to guide you how to setup SSH keys, configure them and clone the main/plugin repos for our WordPress sites.
Prerequisites
- GitHub main/plugins repos exist in GitHub. If main repo still exists in Bitbucket and needs to be migrated, follow this tutorial first.
- Access to the repo’s settings to allow adding SSH deploy keys.
- Basic cPanel knowledge and familiarity working in the Shell (shell access must be enabled on the account you are working with).
- Basic git cli knowledge
Step 1 – Create SSH keypair for the main repo
You may enter this process by different means:
- Situation A – Setting up a new Staging or Production cPanel account for a WordPress site. First you’ll need to create a new cPanel account and follow the initial account setup tutorial (hasn’t been written yet).
- Situation B – Reconfiguring an existing staging or production cPanel account that was previously using Bitbucket which likely included the plugins within the main repo. If this is the case you need to first separate the plugins from the main repo by following this tutorial (hasn’t been written yet).
Note: If you are in Situation B skip to step 2.
Login to the cPanel Account and get into the Shell (Terminal).
Create your SSH keypair for the main repo by typing this command in the ~/ directory (the directory that loads when you first login to the shell):
bash: ssh-keygen -t rsaYou will then be asked where to save the file, press enter for the default location
bash: Generating public/private rsa key pair.
bash: Enter file in which to save the key (/home/YOUR_CPANEL_ACCOUNT_NAME/.ssh/id_rsa):
You will then be asked to enter a passphrase, use the one we always use, and then enter it again once it says to.
Enter passphrase (empty for no passphrase):It will then show you a message like this one, indicating that the ssh keypair has been created
The key fingerprint is:
SHA256:CDNKNwQ34JPl8McCu7lOJ1JcejY7LN9fW//EkPe3EbA YOUR_ACCOUNT@host1.YOUR_HOST.net
The key's randomart image is:
+---[RSA 3072]----+
|  =o=            |
| . @ o           |
|  * @ o      .   |
| o O B .      o. |
|  B + . S    Eo..|
| . = o         +o|
|. = =     . .  .=|
| + = o   . o . .+|
|  . . ... .   .o.|
+----[SHA256]-----+
Step 2 – Create SSH keypair for the plugins repo
Create the Plugins repo SSH keypair. The reason we have to create a separate SSH keypair for the plugins repo is due to security limitations on GitHub that only allow an SSH key to be used once, and not shared between repositories.
Run this exact modified command that saves another SSH keypair with a different name for the plugins repo:
ssh-keygen -t rsa -C "Plugins repo key" -f ~/.ssh/plugins_repo_deploy_keyFollow the same steps as we did in step 1 to save the new keypair. This creates:
- ~/.ssh/plugins_repo_deploy_key
- ~/.ssh/plugins_repo_deploy_key.pub
Step 3: Create/Edit .ssh/config
Since we have 2 ssh keypair sets, we need to create an ssh config file so that we can access each of them as needed for the separate main website and plugin repos
Enter this command to create the config file
nano ~/.ssh/configPaste this in and save the file:
# Default GitHub connection (main repo)
Host github.com
    HostName github.com
    User git
    IdentityFile ~/.ssh/id_rsa
    IdentitiesOnly yes

# Plugin repo using alternate key
Host github-plugins
    HostName github.com
    User git
    IdentityFile ~/.ssh/plugins_repo_deploy_key
    IdentitiesOnly yes
Now change the permissions of the SSH keypairs and the ssh config file to ensure we can use them, and they also don’t have more permissions than needed. (Tom: return to this and solidify the permissions used, currently this works perfectly, but could use a review)
Run each of these commands separately
chmod 700 ~/.ssh
chmod 600 ~/.ssh/id_rsa
chmod 600 ~/.ssh/plugins_repo_deploy_key
chmod 600 ~/.ssh/config
chmod 644 ~/.ssh/id_rsa.pub
chmod 644 ~/.ssh/plugins_repo_deploy_key.pub
Now we have the required SSH keypairs to be used in cloning the Github Repos on this account
Step 4 – Add the public keys to each Github Repos
Navigate to the main repo’s “Deploy Keys” setting page:
https://github.com/Kobayashi-Zeitguys/YOUR_MAIN_REPO/settings/keys
Click on the “Add deploy key” button
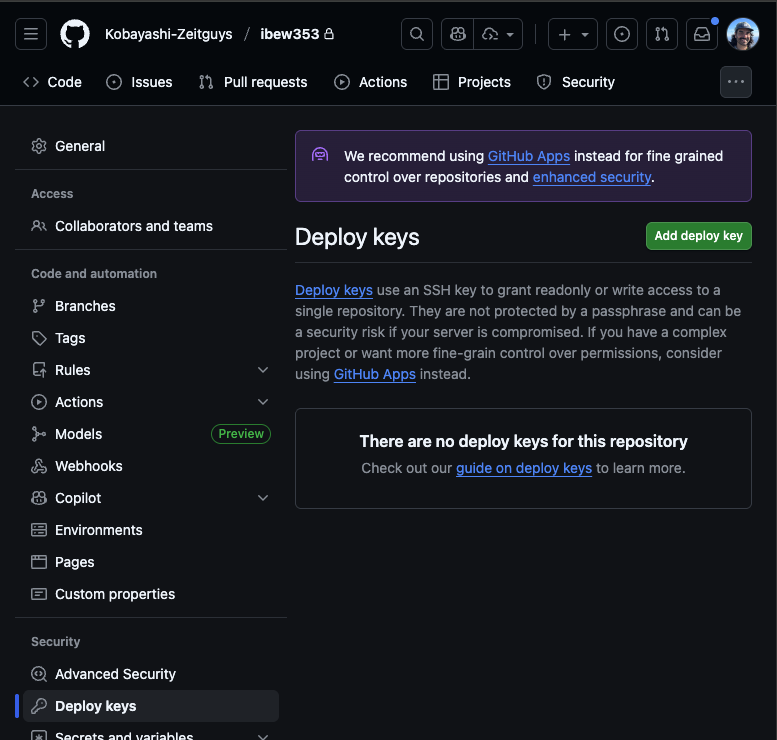
Add a title with the server the repo is on and the purpose. Ex: DevCow VPS – Main website repo
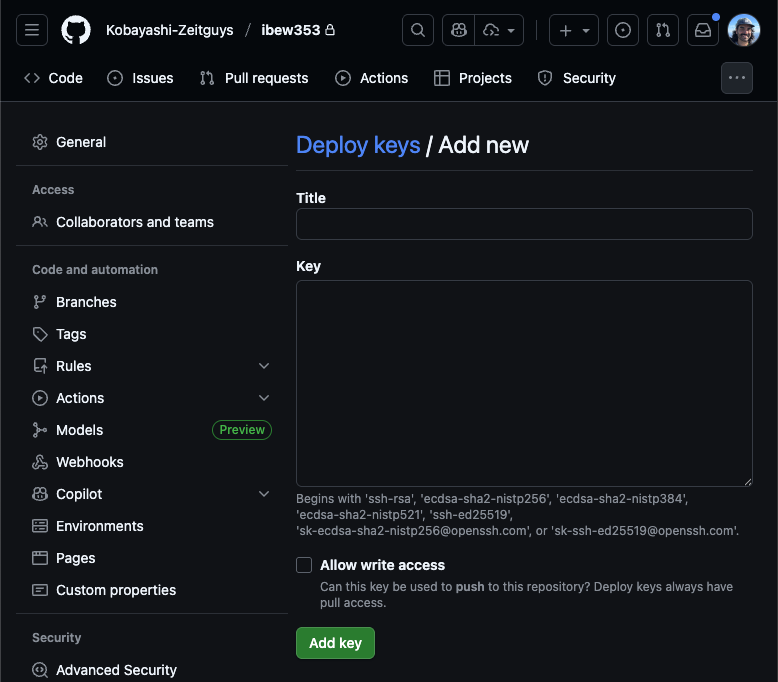
Back in the shell, run this command and then copy the outputted public key:
cat .ssh/id_rsa.pub
Enter it in the “Key” field, click the “Add key” button
Repeat this same process for the plugins repo public key in the separate plugins repo for this project, using this key instead.
bash: cat .ssh/plugins_repo_deploy_key.pub We’re done connecting the SSH keypairs from cPanel to GitHub!
Step 5 – Cloning the repos
Cloning the repositories can happen in few different situations:
- New cPanel account that doesn’t yet have a git repo cloned.
- Existing cPanel account with a BitBucket main website repo. These won’t have a separate plugins repo and will need the plugins separated, follow this tutorial to do this (tutorial not yet created)
Situation 1 – New cPanel account
This is assuming you’ve already installed the WordPress files when creating a new cPanel account, follow this tutorial (tutorial not yet created) if you haven’t done this yet.
Navigate to the public_html folder.
bash: cd ~/public_htmlYou need to delete wp-content folder first. The main repo will be cloned, re-creating the wp-content folder again. The reason we do this is because you can only clone a repo in an empty folder. When you install wordpress it will have the basic files and folders in the wp-content folder already.
If you need to delete the wp-content folder do this, otherwise move to next step
bash: rm -fr wp-contentclone the main repo by running this command:
bash: git clone git@github.com:Kobayashi-Zeitguys/YOUR_MAIN_REPO.git wp-contentThis will create a new wp-content folder and clone the main repo into it.
Assuming the plugins folder has been added to the .gitignore of the main repo, you won’t have a plugins folder now that we’ve cloned the main repo. Navigate to the wp-content folder:
bash: cd ~/public_html/wp-contentClone the plugins repo, with this modified command. Note: the host part of the ssh link to the plugins repo is using the “github-plugins” instead of “github” as we set in the .ssh/config in Step 3. We’re cloning and creating the plugins folder at the same time like we did for the main repo and the wp-content folder.
bash: git clone git@github-plugins:Kobayashi-Zeitguys/YOUR_PLUGINS_REPO.gitThis key difference will use the SSH keypair configured for the plugins repo “plugins_repo_deploy_key.pub”
Situation 2: Existing cPanel account with Bitbucket repo
Navigate to the wp-content folder (if this is where the git root lives, sometimes we have this in the public_html folder)
bash: cd ~/public_html/wp-contentRun this command to change the git remote from BitBucket to Github
bash: git remote set-url origin git@github.com:Kobayashi-Zeitguys/YOUR_REPO.git Check your remotes and refs locally.
git remote -v
git branch -a
git tag
You should be able to run a git pull from Github at this point for the main site repo.
You’ll need to also sort out the plugins folder/repo if it hasn’t been separated from the main repo, follow this guide on how to manage this (guide not yet written)
